Sunday 28 April 2013

experiments on fabric


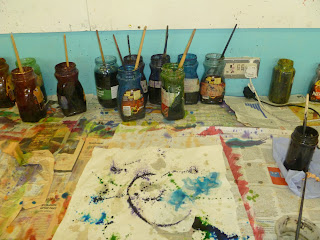
I started experimenting with fabrics and batik dyes. I chose a few pieces of fabric and then decided that i would have a go with the batik dyes. I thought that maybe they could turn out quite interesting because of the texture of the fabric. When i started putting on the dye the fabric immediately started to soak it up, so when i put more colours on the dyes started to run together covering the whole piece of fabric. I thought it was actually nice the way it had blended together. Eventually the colours were too much so i tried to bleach out some of the colours using household bleach and adding a bit of water to it. I then started dropping the bleach on and also i tried pouring and splashing it on to create different effects.


So this was another one i did straight after and i did the same thing again but using different colours. I dropped the dyes on and then i tried drawing into the fabric with the bleach to make my own shapes and patterns. It didn't work that well because the bleach had actually burnt out most of the colour showing the white fabric through again. I couldn't control how far the bleach spreads across the fabric.


This was done on a different type of fabric, the texture of the material was smoother and much more thinner and silkier. This one had a different effect when i put the dyes on because the material didn't soak them up, instead they just fell through the material. The dye did run and blend together leaving a big mess and didn't really leave achieve the effect i was looking for. The bleach didn't really work too well when i put it on last it just didn't take to the material.
I'm going to have to experiment now with other materials and paints.


Saturday 20 April 2013

Planets

Next I decided to go on to researching planets and then just to start with have a go at cutting out some circular shaped planets out of card or paper and then experiment with some acrylic paint and try to create some nice effects or textures. 

These planets were not based on any real planets they were just experiments. 


Some of these were cut out of card, some were also cut out from my last two pieces from before so they took on their own style and compositions. The black planet I had cut out of black card and actually painted myself using a cleaning brush and wiping the paint around the edges.

These were the next set and the planet in the top right was done using a marble effect which was done by adding water to the paint and then pouring it on all at once and then left to dry. The paint then blends together leaving a marble effect.

I decided to make more planets and instead of just using card i decided to use cardboard. So i cut out three separate circles and then coated two of them with emulsion and one with black acrylic paint. Once they were dry i then wanted to try spinning them to create a swirly pattern, so for this i would have to find a quick way of doing that. I did find a banding wheel which is used in ceramics and allows you to put your piece of clay onto it and then you can have a 360 degree spin on it. 

I then attached my planet shaped pieces of cardboard to the wheel using white-tack and then i got a selection of acrylic paints. I then spun the wheel as fast as i could to really get it spinning, however it did slow down quickly and it was hard to paint onto it while it was still spinning. Also, i realized that the spinning wasn't constant enough. I thought about asking a classmate to spin it for me whilst i paint onto it. Another problem i came across was that the acrylic paint was not liquid enough to spread across the surface of the cardboard so i had to find something that would spread a little better. Finally i decided to use indian ink which was better.
These are the end results:

I believe that the one with the ink worked best, however all three are quite different.


Once i had finished i then thought that it could be really good to use this idea and then look at Damien Hirsts' spin paintings and combine my initial ideas with spin painting. Maybe I can look into this idea and see how Damien Hirst does them.


I decided to continue my research on planets and i wanted to have a go at making some models. I thought about materials and my idea was to try using some gum tape. Gum tape is sticky on one side and smooth on the other, it's a bit thicker than masking tape.

I found a mould from ceramics that would give me a planet shape. However i will have to make it in two halves.


The first step was to rip the tape into small strips and then get myself a pot of water so that i can then dip the tape into the water and soak the tape. This then will allow me to stick it to the mould, i also made sure that the shiny side of the tape was facing the inside so that when it's finished i will have the smooth side showing.

I would repeat this method until it becomes strong, you have to make sure you do enough layers so it does not fall apart. I then did the other half.


This is what it looks like after 2 or 3 layers I will now leave it to dry and then try and paint it.


Now i have my two halves and now I can paint them and put them together in some way.

Here i'm just making sure that they do fit together, all i have to do now is paint them, I can try acrylics, batik dyes or even watercolours.

While the models were drying I decided to take the planets into a different direction by experimenting with fabric and batik dyes.


I have my piece of fabric where as you can see i have drawn my planet shape on by drawing around a plate.


This is the next stage, I painted around the planet using black acrylic paint and being very careful around the edge of the circle because i'm leaving it for the batik dyes.
The black background represents space.
Next i'm going to fill it in.
 
 
This is the last stage. I used orange, yellow, crimson coloured dyes and splashed them all on at the same time so that they would blend together. I found that it turned out really well so afterwards I heated up some liquid wax and poured and dripped on the wax. I left it to cool and then later I could melt off the wax by ironing it out. The wax will then leave white areas where i have poured it on. I'm really pleased with it and I only wish I had more time to make more of them.

Spiral Galaxies


The title of my Final Major Project is "Gazing at the Galaxy" 
My starting point was to gather lots of research on my theme which is all about the galaxy. I started by collecting lots of images and information about space. I also decided that I wanted to base my project on abstract expressionism, so I started looking at some artists that relate to this subject such as Marc Rothko, Jackson Pollock, Juan Miro and also Damien Hirsts' spin paintings.


I started by experimenting with what is called "Action Painting". This technique involves painting with lots of energy and also painting using objects and experimenting with different textures. I just started putting the paint on and then using a brush i started moving the paint around and then dipping it in the paint to try and print on some stars around the edge of the paper. I was trying to create an abstract style galaxy. These two pieces were inspired by NASA'S photographs of actual spiral galaxies taken by their satellites.

I also found the BBC space universe website to be very useful when collecting images.
 
 
Next I thought it was a good idea to continue the spiral galaxies so I decided instead of using paint on paper, I thought about using fabric and batik dye to see if I could create a different technique or method of making some really interesting galleries.
 
 
I'm using the batik dyes in the textiles department to splash some of the dyes onto my fabric and hopefully try and create a galaxy like image in the middle of it. Batik dye changes when it dries it loses it's vibrancy because the material does soak it up.
 
 
I have also in certain areas added some bleach so that takes out some of the colour and gives a really strange effect. Once most of it was dry I poured on some liquid wax onto this piece and later I can melt it with an iron. When I had actually finished it i'm not sure that it was all that succesful because it ended up turning into a blob like mess so maybe i could have used less dye or bleach if  I did it again.