Alfons Schillings
Alfons Schillings spin art
google search alfons schilling
Mark Chadwick
Mark Chadwick oil and spin paintings
http://www.markchadwick.co.uk/
Tim Hemington
http://www.timhemington.co.uk/
http://www.nga.gov/feature/rothko/intro1.shtm
You tube videos:
Spray Paint space art:
https://www.youtube.com/watch?v=Oj8xtk42D1s
March 2013 preview spray paint art secrets
Space art pastel green nebula
Saturday, 15 June 2013
Friday, 14 June 2013
preparing for my final idea
Now i am ready to start thinking about my canvases that I want to make so now I need to collect my bed sheets that I will need to place over the frame. I have decided i want to make 2 canvases in total. I have decided how big they are going to be, they will be 125cm x 125cm. I will need to make sure my bed sheets are cotton. I have asked Andy the technician in the workshop if he could kindly help me put the frames together. Once I had my frames I could then attach my sheets to both of them. Using some stretching tools and a staple gun I stretched the sheets over the frames this would then give me two canvases to work on. I am going to use batik dyes to get that same effect as before, I am really excited to get started!

I have finally finished painting my canvases with batik dye. I used a small selection of batik dyes and some bleach, 2 big brushes and some water to complete my paintings. I am going to do both of my paintings in the same way.

Next I am going to start making my stencils so that I can paint on some spaceships using PVA and that will be really interesting.


I have finally finished painting my canvases with batik dye. I used a small selection of batik dyes and some bleach, 2 big brushes and some water to complete my paintings. I am going to do both of my paintings in the same way.

Here is a close up of the painting you can see how vibrant it becomes on such a large scale it looks fantastic however when it starts to dry it will fade a little bit. I did also try adding some rock salt into it while it was wet. It could turn out really nice.Next I am going to start making my stencils so that I can paint on some spaceships using PVA and that will be really interesting.

Using my model spaceships I am now going to use a projector to cast the shapes of the shadows they create onto a piece of card and then I can draw around the shadow and that will give me a stencil that I can cut out later on. I repeated this process until I had lots of different stencils to work with.

I can now cut out the shapes from the card and this will give me my stencils.
Model spaceships
To continue with my theme of space I wanted to start building some model space ships. Taking inspiration from my favourite science fiction shows and movies such as Star wars, Star Trek and Prometheus, I wanted to design my own spaceships. I looked on the internet at images of spaceships and I chose ones that I was familiar with and ones that i had not seen before.
Google images of spaceships
http://www.startrek.com/
http://www.startrek.com/galleries
http://starwars.com/
Prometheus film review
Using the images I had found on the internet I thought that I should collect some materials to work with from the workshop such as wood and mdf and use some scrap pieces that other students no longer needed and build them. I thought that this would make them more interesting and more random.
I did also cut some pieces to shape using the band saw.
So once I had found some interesting shapes to work with I started to build them straight away.

As you can see they are starting to take shape, ive have been putting them together using PVA glue and then afterwards I will sand off all the sharp edges using my sandpaper. I have finished one of them and when they are all finished I will prime them with emulsion so later I can paint them.


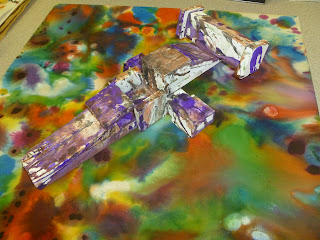
I have given them a thin coat of emulsion and leaving them to dry, then I will give them another coat so they have two coats of emulsion and they will be ready to go. I have decided to spin paint them using poster paints, I have chosen prussian blue, black and also I have combined some purple drawing ink. They have turned out really well, I believe they were successful. It was however difficult to cover the entire model with paint so there are a few white patches but I don't mind.

So now that they are dry and finished I'm having a look at what they look like against a colourful background. I have placed the ship on top of a canvas that I had made earlier in the project where i was experimenting with the batik dyes.


I'm thinking about what to do with them now maybe placing them in front of a canvas like this one is the next stage. So now I need to decide what I need to make next. I also think that a larger canvas is definitely needed and then maybe I could hang them in some way.
Sunday, 19 May 2013
Spin art on ceramic bathroom tiles

I was to use e-ware glazes on these rather than slips because they are really thin and would fly across the surface of my tiles. I had a big box of tiles and they were really cheap so they were perfect to work on.
I decided to work on just two tiles to begin with to see what happens. I chose a selection of coloured glazes such as bronze, black magic, turquoise and light blue. I would start off with putting on the darkest colour first and then the lightest colours over the top, I found that was the best way to get the best results.
Using the same method as before i squirted the glazes onto the tile.
This is what they looked like before going into the kiln. Andy the technician has told me that he's not sure how well they will fire in the kiln so we will just have to hope for the best.

I have done another set just in case the others don't survive.

These are my final set and this time i have changed the colours i have used and I think that they have been the most successful.
Painting
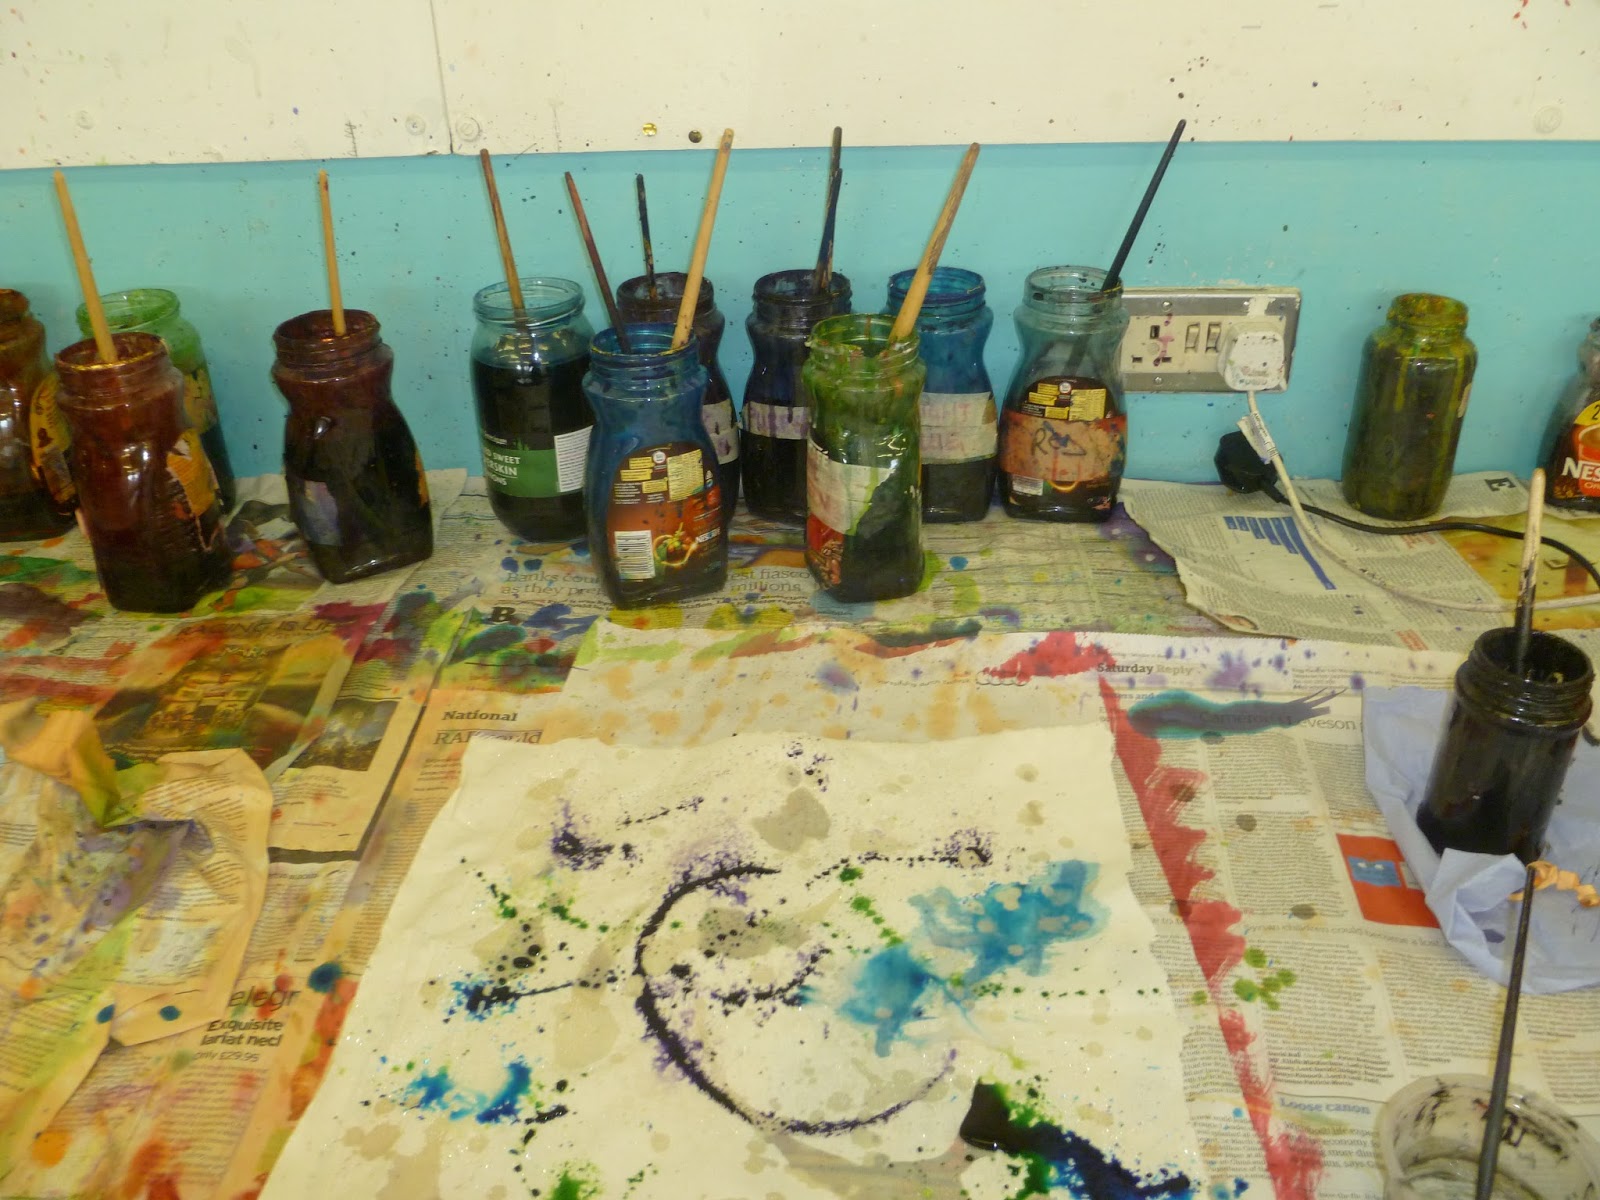
I'm going to try a different way of painting. I can try using some batik dyes and spread the dye across the paper by blowing it around with a straw. This will give me a completely different effect.

 I also found that the colours had to be built up in layers to achieve a really good pattern. The next thing i did was add washing up liquid to the dye and mixed it together in the pot and then it would become soapy and then i made a bubble blower out of some wire and then dipped it in the pot and blew a really big bubble onto the page. The bubble turned into a nice planet like shape and left a really nice blob on the paper. I was already familiar with this because I had already tried doing this before. I also found that it only works best with dark coloured dyes.

I'm blowing the dyes around to get them to blend and spread together, I'm also adding some bleach to take out some of the colour. I found that the bleach creates lighter shades of colours and makes the dye more interesting.

Saturday, 18 May 2013
Spin art
My next idea was to try some spin art, which i researched on the internet and i found a selection of artists who have experimented with this way of painting.
Here are a few artists and links:
Taking inspiration from these artists and their spin paintings I decided to give it a try myself, it seemed really interesting to me. I decided to use the spinning wheel in our ceramics room to try and get a similair effect.
My first attempts were done on small pieces of paper, i used poster paint and added water to it so that it was very liquid and would fly around on the paper. To drop the paint onto the paper I used what are called slip trailers and sucked up the paints out of the jugs I had put them in. I can then squeeze them and the paint will come out in a controled way.
I thought that my first efforts were really good and they turned out better than i had expected them to be. The good thing about using the wheel is that it has a pedal so i can adjust the speed and control the speed to get different effects. I'm now going to think about using other materials and try different paints.
Sunday, 28 April 2013
experiments on fabric

I started experimenting with fabrics and batik dyes. I chose a few pieces of fabric and then decided that i would have a go with the batik dyes. I thought that maybe they could turn out quite interesting because of the texture of the fabric. When i started putting on the dye the fabric immediately started to soak it up, so when i put more colours on the dyes started to run together covering the whole piece of fabric. I thought it was actually nice the way it had blended together. Eventually the colours were too much so i tried to bleach out some of the colours using household bleach and adding a bit of water to it. I then started dropping the bleach on and also i tried pouring and splashing it on to create different effects.

So this was another one i did straight after and i did the same thing again but using different colours. I dropped the dyes on and then i tried drawing into the fabric with the bleach to make my own shapes and patterns. It didn't work that well because the bleach had actually burnt out most of the colour showing the white fabric through again. I couldn't control how far the bleach spreads across the fabric.


This was done on a different type of fabric, the texture of the material was smoother and much more thinner and silkier. This one had a different effect when i put the dyes on because the material didn't soak them up, instead they just fell through the material. The dye did run and blend together leaving a big mess and didn't really leave achieve the effect i was looking for. The bleach didn't really work too well when i put it on last it just didn't take to the material.
I'm going to have to experiment now with other materials and paints.
Saturday, 20 April 2013
Planets
Next I decided to go on to researching planets and then just to start with have a go at cutting out some circular shaped planets out of card or paper and then experiment with some acrylic paint and try to create some nice effects or textures.
These planets were not based on any real planets they were just experiments.
 Some of these were cut out of card, some were also cut out from my last two pieces from before so they took on their own style and compositions. The black planet I had cut out of black card and actually painted myself using a cleaning brush and wiping the paint around the edges.

These were the next set and the planet in the top right was done using a marble effect which was done by adding water to the paint and then pouring it on all at once and then left to dry. The paint then blends together leaving a marble effect.


Once i had finished i then thought that it could be really good to use this idea and then look at Damien Hirsts' spin paintings and combine my initial ideas with spin painting. Maybe I can look into this idea and see how Damien Hirst does them.
I decided to continue my research on planets and i wanted to have a go at making some models. I thought about materials and my idea was to try using some gum tape. Gum tape is sticky on one side and smooth on the other, it's a bit thicker than masking tape.
I found a mould from ceramics that would give me a planet shape. However i will have to make it in two halves.

The first step was to rip the tape into small strips and then get myself a pot of water so that i can then dip the tape into the water and soak the tape. This then will allow me to stick it to the mould, i also made sure that the shiny side of the tape was facing the inside so that when it's finished i will have the smooth side showing.
I would repeat this method until it becomes strong, you have to make sure you do enough layers so it does not fall apart. I then did the other half.

This is what it looks like after 2 or 3 layers I will now leave it to dry and then try and paint it.

Now i have my two halves and now I can paint them and put them together in some way.

Here i'm just making sure that they do fit together, all i have to do now is paint them, I can try acrylics, batik dyes or even watercolours.
While the models were drying I decided to take the planets into a different direction by experimenting with fabric and batik dyes.

I have my piece of fabric where as you can see i have drawn my planet shape on by drawing around a plate.


These planets were not based on any real planets they were just experiments.


These were the next set and the planet in the top right was done using a marble effect which was done by adding water to the paint and then pouring it on all at once and then left to dry. The paint then blends together leaving a marble effect.
I decided to make more planets and instead of just using card i decided to use cardboard. So i cut out three separate circles and then coated two of them with emulsion and one with black acrylic paint. Once they were dry i then wanted to try spinning them to create a swirly pattern, so for this i would have to find a quick way of doing that. I did find a banding wheel which is used in ceramics and allows you to put your piece of clay onto it and then you can have a 360 degree spin on it.

I then attached my planet shaped pieces of cardboard to the wheel using white-tack and then i got a selection of acrylic paints. I then spun the wheel as fast as i could to really get it spinning, however it did slow down quickly and it was hard to paint onto it while it was still spinning. Also, i realized that the spinning wasn't constant enough. I thought about asking a classmate to spin it for me whilst i paint onto it. Another problem i came across was that the acrylic paint was not liquid enough to spread across the surface of the cardboard so i had to find something that would spread a little better. Finally i decided to use indian ink which was better.
These are the end results:

I believe that the one with the ink worked best, however all three are quite different.
Once i had finished i then thought that it could be really good to use this idea and then look at Damien Hirsts' spin paintings and combine my initial ideas with spin painting. Maybe I can look into this idea and see how Damien Hirst does them.
I decided to continue my research on planets and i wanted to have a go at making some models. I thought about materials and my idea was to try using some gum tape. Gum tape is sticky on one side and smooth on the other, it's a bit thicker than masking tape.
I found a mould from ceramics that would give me a planet shape. However i will have to make it in two halves.

The first step was to rip the tape into small strips and then get myself a pot of water so that i can then dip the tape into the water and soak the tape. This then will allow me to stick it to the mould, i also made sure that the shiny side of the tape was facing the inside so that when it's finished i will have the smooth side showing.
I would repeat this method until it becomes strong, you have to make sure you do enough layers so it does not fall apart. I then did the other half.

This is what it looks like after 2 or 3 layers I will now leave it to dry and then try and paint it.

Now i have my two halves and now I can paint them and put them together in some way.

Here i'm just making sure that they do fit together, all i have to do now is paint them, I can try acrylics, batik dyes or even watercolours.
While the models were drying I decided to take the planets into a different direction by experimenting with fabric and batik dyes.

I have my piece of fabric where as you can see i have drawn my planet shape on by drawing around a plate.

This is the next stage, I painted around the planet using black acrylic paint and being very careful around the edge of the circle because i'm leaving it for the batik dyes.
The black background represents space.
Next i'm going to fill it in.

This is the last stage. I used orange, yellow, crimson coloured dyes and splashed them all on at the same time so that they would blend together. I found that it turned out really well so afterwards I heated up some liquid wax and poured and dripped on the wax. I left it to cool and then later I could melt off the wax by ironing it out. The wax will then leave white areas where i have poured it on. I'm really pleased with it and I only wish I had more time to make more of them.
Spiral Galaxies
My starting point was to gather lots of research on my theme which is all about the galaxy. I started by collecting lots of images and information about space. I also decided that I wanted to base my project on abstract expressionism, so I started looking at some artists that relate to this subject such as Marc Rothko, Jackson Pollock, Juan Miro and also Damien Hirsts' spin paintings.


I started by experimenting with what is called "Action Painting". This technique involves painting with lots of energy and also painting using objects and experimenting with different textures. I just started putting the paint on and then using a brush i started moving the paint around and then dipping it in the paint to try and print on some stars around the edge of the paper. I was trying to create an abstract style galaxy. These two pieces were inspired by NASA'S photographs of actual spiral galaxies taken by their satellites.
I also found the BBC space universe website to be very useful when collecting images.
Next I thought it was a good idea to continue the spiral galaxies so I decided instead of using paint on paper, I thought about using fabric and batik dye to see if I could create a different technique or method of making some really interesting galleries.
I'm using the batik dyes in the textiles department to splash some of the dyes onto my fabric and hopefully try and create a galaxy like image in the middle of it. Batik dye changes when it dries it loses it's vibrancy because the material does soak it up.

I have also in certain areas added some bleach so that takes out some of the colour and gives a really strange effect. Once most of it was dry I poured on some liquid wax onto this piece and later I can melt it with an iron. When I had actually finished it i'm not sure that it was all that succesful because it ended up turning into a blob like mess so maybe i could have used less dye or bleach if I did it again.
Subscribe to:
Comments (Atom)